


Your cart is currently empty!
In Progress » Junker Plane ‘Mosquito’
02.19.2006» Concepts
/ Intro
Well, now I have 2 projects on hold
so I’ve randomly decided to start a 3rd. This
started out as a German Me-109 for an IPMS Group
Build where you could basically do anything you
wanted to a 109 as long as it resembled a 109
in the end. I had started cutting it apart to
make it look like a robot that had transformed
from a 109, but wasn’t going to meet the deadline
so I put it away. Then at the IPMS X-mas party,
I recieved another 109 in the white elephant game.
I really wasn’t sure what to do with it as I’m
not big on building WW2 aircraft. I like looking
at them, just no real motivation to build one.
Both 109’s are exactly the same except for color
and quality. The gray one has far more flash than
the green.
Anyway, the other day I was trying
to figure out what to start next that I wouldn’t
need to worry about waiting on parts and ending
up with another on-hold project. I found the 109s
and remembered playing a PS2 game called ‘Sky
Gunner’. I didn’t like the gameplay much, but
I did like the open-seat single pilot aircraft
designs. Based on that I started playing with
ideas for making a MaK-like aircraft that’s ridden
like a motorcycle.
Story-wise… These style aircraft
were initialy manufactured as racers. Later when
the war broke out, Mercenary pilots began using
them as scouting craft due to their high speed,
agility, and ability to fly low and fast to avoid
radar detection. They were eventually equiped
with a gatling-gun mounted underneath, but were
not all that useful in combat due to the lack
of pilot protection. The mercs nicknamed the craft
‘Mosquitos” as they were annoying to enemy
forces, but easy enough to swat down.
I started playing around with the
chopped-up 109 first (gray) then eventually decided
to start cutting up the green oe to use as well.
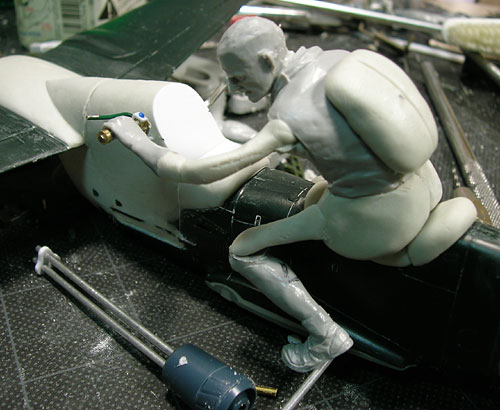
As you can see below, this craft will be sort
of a bi-plane in the front. Ignore the tape and
wire as i just used them to put the wing into
a rough position. I think I want it forward a
bit more. Eventually I’ll make some nice rigging
and booms to hold the front wing into place. The
seat and other smoothing was done with Magic Sculpt.
I still need to make the contour on the top-front
that meets the instrument panel and the motorcycle-handle-like
controls. I’ll also need to sculpt most of the
pilot fig as the one shown is just sticy-tacked
into a rough position. The final pilot will have
a flight-cap, goggles, parachute and a nice scarf.
Anyway, it’s a work in progress and here’s some
pics:


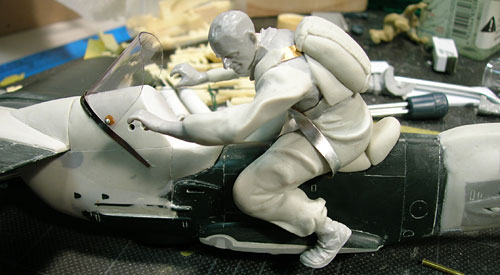
02.21.2006 » Seating
for One
Based on advice from Zerobxu I changed
the position of the pilot to ride more comfortably.
He’s into motorcycles and suggested this would
be better and I agree. It looks better and adds
more of an element of speed to the pose. This
won’t be the final figure as I’ll need to scratch-build
a new one to fit properly, but for mock-up I’m
using bits of the 1/20 Tamiya Pit Crew set stickytacked
together. I will however be cutting off and using
some of their boots, these hands and a head which
will be modified with a flight cap and goggles
later on.
I also got the bulk of the upper-front
portion formed from Magic Sculpt. I still have
some cleaning, smoothing, sanding, and more MS
to add, but it’s coming along nicely.

02.22.2006 » Skeleton
Crew
Since the last update I did some
more clean-up on the “hood” and made
the handlebars and grips. These were made with
bent wire, wrapped thin wire, and bits of tubing.
I needed to make these and put the foot-rests
on before posing the pilot fig. I did a lot of
chopping up for figs to get the pose I wanted
which is that of the pilot leaning slightly to
the side and looking over and down. I first removed
the head from the torso and made a new neck to
get the head into position. Next I took some MS
and made a rough lower body. Then I cut off the
hands and feet I wanted and added them to the
body with floral wire to keep the pose. Lastly
I added more MS around the wire and into the body
to hold the shape of the wire when I go to add
the clothing. The result is a weird skeleton-looking
man.
Tomorrow I’ll be able to start adding
the clothing and such that will make up the flight-suit.
You can also see a rough blob on the back. This
is the start of the parachute. I also need to
make the cloth cover for around the handlebar
attachment points to make them look “moveable”.
Oh, and in the last pic, you can see the start
of my gatling gun.


02.24.2006 » Bulking
Up
The pilot is starting to take shape
now with added bulk from the clothes. It’s a slow
process however as you can’t do too much at once
lest you accidentily mash parts that are still
uncured. I’ve done that a lot already and have
had to fix quite a few spots. I also started making
the wind-screen from heat-formed clear plastic
and misc photoetch given to me from an IPMS member
who didn’t need it.


02.25.2006 » On the
Skids
The pilot is still taking shape
a little bit at a time. THe only thing I have
a photo of at the moment (even though I’m slightly
farther with the arms) is the lead-foil straps
on the chest where I made hooks from leftover
LED leads. Pays to packrat small bits of wire
I suppose. I also added a pic of the underside
of the wings as someone was curious about them.


I also finished the skids. Again,
they’re a little farther along than the pic shows,
but not by much. The only change is that I added
some hex-bolts on the outsides of the ski-mounts.
They’re made from brass tube, strips, and rod,
styrene shapes and 1/300 747 aircraft landing
gear parts.

02.26.2006 » Pedal
to the Metal
Here’s some more progress shots.
First is the pilot which is almost sculpted completely.
Well… I still need to do a lot of sanding and
carving and a nice scarf and details, but he’s
almost done. I also did the cloth covers for where
the handelbars meet the fuselage.


Next up is the gatling gun which
is almost done except for finishing the mount
to the underside of the plane.

The landing gear is done as well.
They too just need mounted.

Here are the foot-rests/pedals I
made from photoetch non-slip plate, aluminum tube,
brass wire, angles-shaped styrene, misc aircraft
resin bits, and mesh screen.


Finall, here’s the wire basket I
made for the molitov cocktails. It still needs
a bit of work, and the mounts created but it’s
coming out well..

03.02.2006 » Primed
But Not Ready
I took some shots of the Mosquito
primed today. It’s not all primed as it’s still
not done. I needed to prime it to see how I’ve
done so far on the sanding and shaping. I have
a bit of clean-up but nothing too major. The pilot
is looking good, but has a ton of fingerprints
to clean up from sculpting him. Here’s the pics:


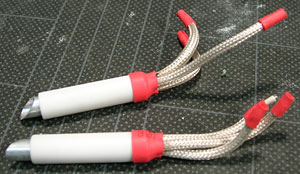
03.05.2006 » Exhausted
I’ve been cleaning up the sculpted
parts of the mosquito and adding details since
the last update. One detail I haven’t shown much
of yet is the exhaust pipes. These are made from
fiberglass braided tubing with wire inserts, styrene
tube, aluminum tube, and heat-shrink tube. Here’s
some pics:

03.10.2006 » Paint
Time!
The Mosquito is all primed and mostly
painted. First I primed everything in dark gray
Duplicolor primer. Then I gave everything a base-coat
of Tamiya Brown. For the plane colors, I painted
the craft first with a mixture of Nato Brown,
Desert Yellow, and Red. That was painte don as
highlights leaving some brown show through as
a preshade. Then on the underside of the craft
I painted straight Desert Yellow and faded that
upward into spots as a sort of cheap Junker camo.
Next when that cures in to paint the white tips
of the wings and the white stripe behind the seat
where 2 of the tubes connect. I also need to paint
the “leather” part in front of the instrument
panel the same color as the seat.


I also painted just about everything
else with their base coats. The “nose”
of the prop is Yellow mixed with a little Red.
The canteen is just Khaki Drab so far and the
fluffy bed roll is Khaki. The roll was made from
wetting and rolling facial tissue and tying thread
around it. The tissue frayed all over, but that
gave it a wool-look which IMO looks pretty cool.
The pilot was painted in a mixture of Khaki Drab,
Buff, and Khaki. The result is a dull buff-gray-green
color which looks great in person. The flight
cap will either be light brown leather or dark
gray. The boots will be light brown leather. The
armor part for the cap is obviously red. The scarf
will be a beige/off-white color.


03.11.2006 » Chips
and Figure
Here’s my progress update for today.
The Mosquito was striped with white and Futured
last night and decals and paint chips were added
today. I also painted more of the pilot figure.
He was painted first in Tamiya acrylics with the
jump-siut being airbrushed as seen above. All
the other colors have been hand-painted. After
giving them all their base colors except the scarf
knee pads and cap (since they will and have gotten
oils all over them) which will be painted after
the skin dries. The skin was painted with a base
coat of acrylic then highlighted and shaded with
oils. The other parts of the figure were highlighted
with white oil paint. Next up, the wash… Here’s
some pics:


03.13.2006 » Staining
Yesterday I added the wash (which
was a medium mucky brown) and the staining with
oils. These were done the same way as on my KV-2
except I used different colored paints this time
for the stain. Blue, white and yellow. Next up
is a flat coat to seal and even the finish then
the dusting with pigment powders. Here’s some
pics:


03.13.2006 » Dusted
Here’s the latest with dist and
rust and some pre-building. I still have to sand-dust
the rusted parts.


03.14.2006 » Figure
The figure is almost done. He just
needs pack hook painted, another flat-coat, mic
and rip-cord added, then some dust to make him
look like he’s been busy and also to blend him
better with the plane. Also pictured is the gatling
since I keep forgetting to photograph it. It too
needs dust and some more graphite applied.


03.14.2006 » Instrument
Panel and Stowage
More progress… the instrument
panel is made from brass bezels and panels given
to me from John Huff (Tazman3). They worked out
beautifully for this kit! I painted the panels,
but left the bezels in their natural brass finish
for an old-timey look. The stowage is some G scale
wine bottles for molitov cocktails wrapped in
a mesh, a canteen, and a bedroll.


![Maude [Cyborg Action-Doll] (Files Only)](https://fichtenfoo.net/blog/wp-content/uploads/2023/01/Maude-Promos-300x300.jpg)


