SmartMoto Mobile Service Software Unlock Manual
Download PDF English or Italian version of User's Manual for SmartMoto v.1.23 and lower.
SmartMoto is a flashing, repairing and unlocking software meant to be used with Smart-Clip and S-Card dongle. Free of charge download of SmartMoto is available at our web site.
  
- Unlock/IMEI repair procedure for the MotoMAGX based models
- Repair Manual for the MotoMAGX based phone models that hang at Moto logo
- Standard unlock procedure for P2K models
- V18x/V22x/C65x/C38x/E375/E378i (newer versions), C975/C980/V980/E1000 (Boot Loader 0.6.1.2) unlocking note
- Unlock procedure for A920/A925/A1000
- Axxx/Exxx/Vxxx unlocking note
- C975/E396/E398/E1000/V635/V980 unlocking note
- SE J100/C115/C116/C117/C118/C123/C139/C140/C155/C156/E365/V170/V171 unlocking procedure
- Chi Mei unlocking procedure
- Sony Ericsson J110i, J120, J132, T250i, T303, Z250i, Z320i unlock procedure
- Compal ("Calypso+" based) models unlock procedure
- Compal ("Locosto" based) models unlock procedure
- Motofone F3 pinout
- Motofone F3 Unlock Clip
- Unlock code calculator (by IMEI and PID)
- WX series, Alcatel and Vodafone MTK unlock instruction
- WX series, Alcatel and Vodafone MTK Direct Unlock instruction
- EX series unlock instruction
- User code reading for MTK-models
- Remove RSA
- Unlocking V3, V560 (boot ver.8.26)
- Unlocking E1000, V1050, V975 (ver R245_xxx) (inc. boot 0.6.1.2) and others models with boot 0.6.3.1
- Non-TestPoint unlocking procedure (Prepare Cycle description)
- Prepare Smart TestPoint
- C975 (fw … 91i)/E1070 (fw ... F11P) unlock procedure
- I-Mode unlock instruction
- General TestPoint connection method
- General "Unlock via TestPoint" procedure
- A1200, E2, E6 "Unlock via TestPoint" procedure
- Unlock procedure for M1000
- M1000 (boot version 0.6.1.2) needs to be unlocked via Remove RSA option
- TestPoint unlock procedure for M1000
- Unlock procedure for A1000 phone with TestPoint
- Sendo snd2xx/snd3xx/snd5xx/snd6xx/snd8xx unlocking procedure
- Smart-Clip update procedure
Unlock/IMEI repair procedure for the MotoMAGX based models
Aura, E8, EM30, EM35, U9, V8_512, V8_2Gb, V8_2Gb_Luxury, VE66, Z6, Z6w, ZN5, ZN5-128MB
- Connect handset, in flash or normal mode, to PC via Smart-Clip (phone > USB cable > Smart-Clip > LPT cable > PC).
- Launch SmartMoto.
- Choose "Smart-Clip USB port (MotoMAGX)" in phone connection window.
- Press "Search".
- Log to Unlock tab/Restore IMEI tab
- Select the appropriate model from SmartMoto list. Make sure that phone model exactly matches the model stated in the list. Alternatively use "Automatic Model Detection" option it will recognize phone automatically.*
- Press "Unlock" button/ type repaired number and press "Restore IMEI" button.
- The message "Unlock – OK"/"Restore OK" informs that process completed successfully.
- The handset restarts and can be disconnected.
"Automatic Model Detection" option can be used only for the handsets that Power On normally. If the set stays in Flash mode, phone model has to be selected manually.
Repair Manual for the MotoMAGX based phone models that hang at Moto logo
Aura, E8, EM30, EM35, U9, V8_512, V8_2Gb, V8_2Gb_Luxury, VE66, Z6, Z6w, ZN5, ZN5-128MB
- Connect phone in Boot Mode (press and hold *# PWR ON buttons) to PC USB port, launch SCout multiflasher and flash the phone with required *.pcf flash file
- After flashing procedure the phone is being restarted. Remove the battery from the phone as soon as reboot procedure starts. Phone doesn't have to turn on!
- Disconnect USB cable from the phone, insert battery back and start it in Boot Mode (press and hold *# PWR ON buttons)
- Connect the phone in boot mode to PC via Smart-Clip, run SmartMoto
- Choose "Smart-Clip USB port (MotoMAGX)" in phone connection window
- Press Search button, log to Unlock bookmark and press "Unlock" button in order to repair the phone
- The message "Unlock – OK" informs that process completed successfully.
- The phone Powers On and shows "Insert SIM" message.
Please note that the phone shouldn't power on until the last stage completed. If the phone powers on before Repair procedure completes, repeat whole operation from the beginning.
Standard unlock procedure for P2K models
- Power on the Smart-Clip from power adapter and E/G indicator will light green.
- Power on the phone without SIM card and flash card (if present).
- Connect the phone to Smart-Clip and press the "Unlock" button (red on older Clips).
- E/G indicator will light green and go off, the phone will switch off (some models will automatically turn on then).
- E/G will light green on success or red on error.
- Successful unlock resets User Code to 1234, Security Code to 000000.
V18x/V22x/C65x/C38x/E375/E378i (newer versions), C975/C980/V980/E1000 (Boot Loader 0.6.1.2) unlocking note
Unlocking newer versions of V18x/V22x/C65x/C38x/E375/E378i or C975/C980/V980/E1000 (Boot Loader 0.6.1.2) may require additional user intervention.
It may happen that E/G led still blinks after display turns off – it means that you have to turn the phone ON manually within 2-3 seconds after display turns off; alternatively you can try to unlock these newer versions of V18x/V22x/C65x/C38x/E375/E378i with battery charger on.
Unlock procedure for A920/A925/A1000
- Power the phone on.
- Connect the phone to a powered Clip. Phone display should give "USB cable connected" message.
- Press UNLOCK button on the Clip.
- Phone reloads. Within 5-10 seconds phone display gives "Waiting for PST" message.
- Press 1 and 2 keys simultaneously in upper part of the handset. The phone enters boot mode (if you don't press these two keys during "Waiting for PST" message, the Clip will give red E/G led and you will have to start with step 1 again).
- After 1 and 2 keys have been pressed E/G green led will blink and the phone reboots. Meanwhile E/G will give frequent green blinking and phone will turn on.
- Do not disconnect cell phone from Smart-Clip while green led indicator blinks!
- Green E/G led glows. The cell phone is unlocked.
Axxx/Exxx/Vxxx unlocking note
Don't unplug cable right after phone reboot, wait until E/G led stops blinking!
C975/E396/E398/E1000/V635/V980 unlocking note
Remove flash card from phone before unlocking.
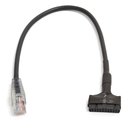
SE J100/C115/C116/C117/C118/C123/C139/C140/C155/C156/E365/V170/V171 unlocking procedure
- Power off the phone.
- Connect the Clip to the phone using RJ45 cable (see pinout schematic below).
- Press UNLOCK button.
- Press Power button on the phone within 5 seconds after you press UNLOCK button on the Clip. RX/TX leds will blink.
- E/G led will glow green on success.*
* After successful unlock (green led on) phones with inserted sim card may ask for PCK or NCK code. Enter 00000000 ("zero" 8 times).
Chi Mei unlocking procedure
MPx200
- Connect S-Card and launch SmartMoto.
- Select "Computer COM ports" in connection window.
- Log to "Chi Mei" tab.
- Power the phone OFF.
- Press and hold "Leftwards" button.
- Connect USB data cable.
- Release "Leftwards" button.
- Select an appropriate COM port in SmartMoto (usually is the highest number).
- Press "Read codes" button.
- Codes are calculated.
- Disconnect the handset.
- Power ON the phone with any sim card inserted.
- Phones menu will popup with unlock code request.
- Enter the code that was read by SmartMoto with the status "Activated".
- Phone unlocked.
MPx220
- Connect S-Card and launch SmartMoto..
- Select "Computer COM ports" in connection window.
- Log to "Chi Mei" tab.
- Power the phone OFF and remove the battery.
- Connect USB data cable (not a Forced Boot Mode cable!!!).
- Select an appropriate COM port in SmartMoto (usually is the highest number).
- Press "Read codes" button.
- Codes are calculated.
- Disconnect the handset.
- Power ON the phone with any sim card inserted.
- Phones menu will popup with unlock code request.
- Enter the code that was read by SmartMoto with the status "Activated".
- Phone unlocked.
Other Chi Mei models
- Connect* powered OFF phone to PC COM port.
- Connect S-Card and launch SmartMoto.
- Select "Computer COM ports" in Phone connection window.
- Log to "Chi Mei" tab.
- Select an appropriate COM port in SmartMoto.
- Pick the required model from the list of supported.
- Press "Unlock" button.
- Press "Power ON" button on the phone, as soon as SmartMoto indicates an appropriate message.
- SmartMoto performs the Unlock process.
- The handset is unlocked.
Note. Please do not use any HUB or extension cable. Connect the handsets to PC USB port directly using an original data USB cable.
MPx models require a driver to be installed. Universal driver for all models is available within SmartMoto directory (SmartMoto install folder \drivers\…). To install the driver: connect your handset to the PC, system will detect a new device, locate the driver and run the installation as many times as system will require it.
* Chi Mei models require to be connected to PC COM port via original COM data cable or using any COM port emulator.
Chi Mei data cable pinouts.
Sony Ericsson J110i, J120, J132, T250i, T303, Z250i, Z320i unlock procedure
- Connect* powered OFF phone to PC.
- Connect S-Card to PC USB port and launch SmartMoto.
- Select "Computer COM ports" in Phone connection window.
- Log to "SE phones" tab.
- Select an appropriate COM port in SmartMoto.
- Select required model from the list.
- Press "Unlock" button.
- Press "Power ON" button on the phone, as soon as SmartMoto indicates an appropriate message.
- SmartMoto performs the Unlock process.
- The handset is unlocked.
* SE models require to be connected to PC COM port via original COM data cable or using any COM port emulator.
Compal ("Calypso+" based) models unlock procedure
C257, C261, F3, V175, V176, V177, W205, W206, W208, W209, W213, W215, W218, W370, W375, W375B, W377
- Connect* powered OFF phone to PC COM port.
- Launch SmartMoto.
- Select "Computer COM ports" in Phone connection window.
- Log to "Compal" tab.
- Select an appropriate COM port in SmartMoto.
- Press "Unlock" button.
- Press "Power ON" button on the phone, as soon as SmartMoto indicates an appropriate message.
- SmartMoto performs the Unlock process.
- The handset is unlocked.
* Compal models require to be connected to PC COM port via original COM data cable or using any COM port emulator.
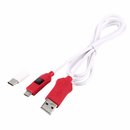
Compal ("Locosto" based) models unlock procedure
EM325, W156, W160, W161, W175, W177, W180, W181, W230, W233, W270, W360, W388, W396, W397v, W450, ZN200
For unlock purposes the specified above models require to be connected to PC USB port.
First connect
- Connect S-Card and Mini USB data cable to PC USB port and launch SmartMoto.
- Select "Computer COM ports" in Phone connection area.
- Log to the tab "Compal models"
- Choose an appropriate model from the list.
- Press Unlock button.
- SmartMoto will inform "Connect phone to computer USB port before proceeding".
- Connect data cable to the powered OFF phone with inserted battery.
- The SmartMoto will automatically (no user intervention is required during the installation) install "Locosto flash interface" driver and display the following message: "reconnect phone and try again".
- Disconnect data cable from the phone, remove and insert the battery back to the phone.
- Connect data cable and press Unlock again.
- The unlock process continues.
- Message "Unlock ok" informs that process is finished and the phone can be disconnected.
If the locosto driver has been previously installed
- Connect S-Card and Mini USB data cable to PC USB port and launch SmartMoto.
- Select "Computer COM ports" in Phone connection area.
- Log to the tab "Compal models".
- Choose an appropriate model from the list.
- Press Unlock button.
- SmartMoto will inform "Connect phone to computer USB port before proceeding".
- Connect data cable to the phone without battery.
- Insert battery.
- The unlock process begins.
- Message "Unlock ok" informs that process is finished and the phone can be disconnected.
NOTE
For unlock purposes the only driver that is required is the "Locosto flash interface" driver. No need to install the phone model driver.
Service functions for Compal models
- Repair EEPROM – this option has to be used when it’s required to perform repair of the corrupted parts of the existing EEPROM in the phone.
- Use default EEPROM (for repair only) – this option allows writing new EEPROM zone to the phone and recalculating it according to the phone parameters.
- Format FFS – format file system. Resets all user settings to the default value and removes all user data.
Motofone F3 pinout
Motofone F3 Unlock Clip
F3 Unlock Clip – is the easiest unlock solution, available on the market yet. It is operated by one button and requires to be powered from mains adapter or even 9V battery.
F3 unlock procedure description
- Connect power to F3 Unlock Clip (9V battery can be used).
- Connect F3UC to the handset, powered on or switched into boot mode*.
- Press Unlock button on the clip.
- LED on the clip starts to blink frequently. Unlock process is in progress.
- On successful unlock, LED stops blinking and lights up for about 10 seconds.
*To switch F3 into boot mode, please power off the phone and press 3 keys combination: *#Power On. The handset display will remain blank.
NOTE
If the LED on F3 Unlock Clip, after frequent blinking starts to blink slower instead of lighting up – the unlock process failed. Please disconnect the phone from the cable, remove and insert the battery, switch the phone to boot mode and perform unlock again.
Unlock code calculator (by IMEI and PID)
Code Calculation Manual
- Connect S-Card to PC USB port and launch SmartMoto.
- Select "Computer COM ports" in Phone connection area.
- Log to the tab "MTK Calculator"
- Choose desired model from the list
- Choose Provider ID from the list.
- Way 1: In most cases, "Provider ID" of your phone can be found at the sticker under the battery. In case providers ID is not specified on the sticker under the battery, try to find it on the phone's package - it should be mentioned there.
- Way 2: If Provider ID is unknown, you can select Security file version. How to do that:
- Dial *#837# or use another combination: *#3228#
- Find the line that starts with *XZ - Security file version
- Choose that security file version in SmartMoto
- Enter phone's IMEI number (type in just numbers, without additional symbols / dashes)
- Click "Calculate unlock codes" button and wait for calculation procedure to start
- Codes are calculated
*Free distribution of unlock codes calculated by Smartmoto Software is strictly prohibited! Violation of this policy will result in your card / box being blocked.
How to enter codes:
- Turn the phone on with non-original SIM card inserted
- Phone's menu will pop-up with unlock code request
- Enter a code that was read by SmartMoto
The phone may not accept unlock code if the wrong unlock code was entered too many times and Wrong Code Counter is filled. In this case try performing "Master reset" operation and then enter the code again.
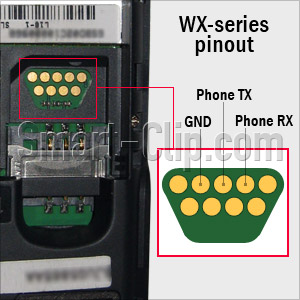
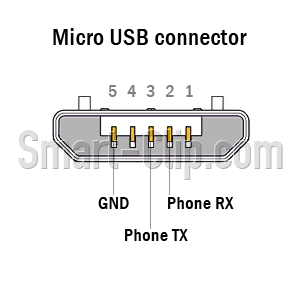
WX series, Alcatel and Vodafone MTK unlock instruction
WX160, WX161, WX180, WX181, WX260, WX265, WX280, WX288, WX290, WX292, WX295, WX306, WX308, WX390, WX395
- Connect S-Card to PC USB port and launch SmartMoto.
- Select "Computer COM ports" in Phone connection area.
- Log to the tab "MTK models"
- Connect* powered OFF phone to PC.
- Select an appropriate COM port in SmartMoto (usually is the highest number).
- Press "Read unlock codes" and follow the instructions in the log window**
- Press and hold "Power ON" button on the phone
- As soon as SmartMoto shows an appropriate message in the log window, release "Power ON" button.
- The message "Reading unlock codes…OK" informs that process completed successfully.
- Disconnect the handset.
- Power ON the phone with the non-original SIM card inserted.
- Phones menu will popup with unlock code request.
- Enter the codes that were read by SmartMoto
- Phone unlocked.
* MTK models require to be connected to PC COM port via original COM data cable or using any COM port emulator.
** Tick the "Work with secondary IMEI" mark to Read codes for secondary SIM.
Pinouts and Drivers
- Download Prolific virtual COM-port drivers
- Download FTDI virtual COM-port drivers
Flash options:
- Force simple mode (slower) – flashing procedure at a slow speed. Should be used if a handset can not be flashed with "Smart Restore"
- Smart restore – Flashing via a special algorithm that provides faster flashing progress. Data that differs from the handset's firmware get flashed, only.
- Format FFS after restore – this option can be used for flashing with backup copies only. If this option checked, the FFS get formatted automatically after the handset is flashed with a backup copy. NOTE: If this option is unchecked and IMEI number in the backup copy and handset is the same, backup get restored without FFS formatting.
* MTK models require to be connected to PC COM port via original COM data cable or using any COM port emulator.
WX series, Alcatel and Vodafone MTK Direct Unlock instruction
WX160, WX161, WX180, WX181, WX260, WX265, WX280, WX288, WX290, WX292, WX295, WX306, WX308 WX390, WX395
- Connect S-Card to PC USB port and launch SmartMoto.
- Select "Computer COM ports" in Phone connection area.
- Log to the tab "MTK models"
- Connect* powered OFF phone to PC.
- Select an appropriate COM port in SmartMoto (usually is the highest number).
- Press "Unlock" and follow the instructions in the log window.
- Press and hold "Power ON" button on the phone
- As soon as SmartMoto shows an appropriate message in the log window, release "Power ON" button.
- The message "Unlock done…OK" informs that process completed successfully.
- Disconnect the handset.
- Phone unlocked*
* MTK models require to be connected to PC COM port via original COM data cable or using any COM port emulator.
Pinouts and Drivers
- Download Prolific virtual COM-port drivers
- Download FTDI virtual COM-port drivers
EX series unlock instruction
EX112, EX115, EX122, EX126, EX128, EX211, EX212, WX345
Please perform Backup Flex and Backup Calibration before unlock procedures, except WX345.
Please remember backup must be saved before performing unlock operation.
- Connect S-Card to PC USB port and launch SmartMoto.
- Select "Computer COM ports" in Phone connection area.
- Log to the tab "MTK models"
- Connect* powered OFF phone to PC.
- Select an appropriate COM port in SmartMoto (usually is the highest number).
- Press "Unlock" and follow the instructions in the log window.
- Press and hold "Power ON" button on the phone
- As soon as SmartMoto shows an appropriate message in the log window, release "Power ON" button.
- The message "Unlock done…OK" informs that process completed successfully.
- Disconnect the handset.
- Phone unlocked**
* EX series models require to be connected to PC COM port via original COM data cable or using any COM port emulator.
** Please perform Restore Flex and Restore calibration after unlock procedure, except WX345
Pinouts and Drivers
- Download Prolific virtual COM-port drivers
- Download FTDI virtual COM-port drivers
User code reading for MTK-models
- Connect S-Card to PC USB port and launch SmartMoto.
- Select "Computer COM ports" in Phone connection area.
- Log to the tab "MTK models"
- Power the phone On, wait till it fully power’s ON, and then power it OFF (Only if ‘Format FFS’ was just performed)
- Connect* powered OFF phone to PC.
- Select an appropriate COM port in SmartMoto (usually is the highest number)
- Press "Read user code" and follow the instructions in the log window**
- Press and hold "Power ON" button on the phone
- As soon as SmartMoto shows an appropriate message in the log window, release "Power ON" button.
- The message "Reading codes…OK" informs that process completed successfully.
- Active user code is marked black, inactive is marked grey
- Disconnect the handset.
- Power ON the phone
- Phone’s menu will pop-up with user code request
- Enter the code that was read by SmartMoto
- User code is accepted by the phone
* MTK models require to be connected to PC COM port via original COM data cable or using any COM port emulator.
Remove RSA
Some handsets require Remove RSA procedure to be performed before actual Smart-Clip unlocking. Remove RSA procedure itself – it’s a partial flashing of the phone firmware.
Unlocking V3, V560 (boot ver.8.26)
- Connect the handset to PC via Smart-Clip (phone > USB cable > Smart-Clip > LPT cable > PC).
- Connect S-Card to PC USB port.
- Connect power supply to Smart-Clip and power on the handset.
- Launch SmartMoto.
- Choose "Smart-Clip USB port" in phone connection window.
- Press "Search". Software should perform the following steps:
- SmartMoto detects S-Card;
- SmartMoto detects Smart-Clip;
- SmartMoto detects the handset and reads all information.
- Log to bookmark "Unlock".
- Pickup correct model from the scrolling list.
- Press Remove RSA.
- Phone goes into boot mode. Part of phone firmware is reflashed.
- The phone powers on and is ready to be unlocked by Smart-Clip using simple "press one button" method (Standard unlock procedure for P2K models).
Unlocking E1000, V1050, V975 (ver R245_xxx) (inc. boot 0.6.1.2) and others models with boot 0.6.3.1
- Connect the handset to PC via Smart-Clip (phone > USB cable > Smart-Clip > LPT cable > PC).
- Connect S-Card to PC USB port.
- Connect power supply to Smart-Clip and power on the handset.
- Launch SmartMoto.
- Choose "Smart-Clip USB port" in phone connection window.
- Press "Search". Software should perform the following steps:
- SmartMoto detects S-Card;
- SmartMoto detects Smart-Clip;
- SmartMoto detects the handset and reads all information.
- Log to bookmark "Unlock".
- Pickup correct model from the scrolling list.
- Press "Remove RSA".
- Phone goes into boot mode. Reserve copy of security area is created.
- Part of phone firmware is reflashed.
- Phone doesn't power on after that. SmartMoto will give the message requiring to take phone into boot mode by pressing keys combination: *,#, PWR ON (at this moment the phone has to be connected with USB cable) or by using Repair cable.
- Press "OK" button. Wait till the process finishes.
- The phone powers on and is ready to be unlocked by Smart-Clip using simple "press one button" method (Standard unlock procedure for P2K models).
Non-TestPoint unlocking procedure (Prepare Cycle description)
The following models can be served avoiding a TestPoint connection:
| Model |
Boot version |
| C390 |
8.26 |
| C975 |
6.36 |
| E1 |
A.02, A.05 |
| E378i |
8.25, 8.26 |
| E770 |
06.71, 06.81, 06.82, 06.83, 06.84 |
| E1070 |
06.71, 06.81, 06.82, 06.83, 06.84 |
| K1 |
A.B2, A.B3, A.B4, A.C0, A.C3 |
| L2 |
8.D0, 8.D5 |
| L6 |
8.D0, 8.D5 |
| L7 |
8.D0, A.20, 09.02 |
| L7e |
A.C.0 |
| L71 |
A.C.0 |
| U6 |
8.A1 |
| V19x |
8.A0, 8.D0, 8.D5 |
| V1075 |
06.71, 06.81, 06.82, 06.83, 06.84 |
| V1150 |
06.71, 06.81, 06.82, 06.83, 06.84 |
| V235 |
8.E0, 9.02 |
| V360 |
8.A0, 8.D0, 09.02 |
| V3 |
8.28, 8.29 |
| V3i |
A.30, A.42 |
| V3r |
A.30, A.42 |
| V3t |
A.30, A.42 |
| V3v |
A.30, A.42 |
| V3x |
06.71, 06.81, 06.82, 06.83, 06.84 |
| V557 |
8.B0 |
| Z3 |
A.C.0, A.C.3 |
| New boots |
A.B3, A.B4 |
Please, be aware of the new unlock procedure:
- Connect powered ON handset to PC via Smart-Clip (phone > USB cable > Smart-Clip > LPT cable > PC).
- Connect S-Card to PC USB port.
- Connect power supply to Smart-Clip and power on the handset.
- Launch SmartMoto.
- Choose "Smart-Clip USB port" in phone connection window.
- Press "Search". The software should perform the following steps:
- SmartMoto detects S-Card;
- SmartMoto detects Smart-Clip;
- SmartMoto detects the handset and reads all phone information.
- Log to bookmark "Prepare".
- Select the appropriate model from SmartMoto list. Make sure that phone model and boot version of the phone to be unlocked exactly match the model and boot version stated in the list.
- For unlock purposes, please make sure that "Unlock automatically" option is marked.
- Press "Prepare" button.
- The prepare cycle starts. SmartMoto creates a Temporary Backup File* from the handset firmware.
For some models, SmartMoto will popup the following instruction to be performed:
- Remove phone’s battery;
- Insert battery back;
- Press power ON;
- Press ok in SmartMoto;
- The prepare cycle will continue.
- At this time popup window appears at SmartMoto interface. Please follow the instructions provided therein
- Disconnect cable from the phone;
- Remove phone’s battery;
- Connect cable to the phone;
- Insert phone's battery;
- Press "Power on" key on the phone. Phone's LCD remains blank;
- Press OK in SmartMoto.
- The handset should be detected by SmartMoto as "S Blank..." with boot 2.00 (3.00).
- SmartMoto restores the temporary backup file
- If the option "Unlock automatically" was marked – the handset becomes unlocked. If the option was not selected then the handset can be served for Flash, Repair PDS, Unlock or Backup purposes.
* Temporary Backup File is created by SmartMoto in work purposes and will be automatically erased from the Hard Drive as soon as unlock process is completed. If the handset was connected to SmartMoto, in boot mode the temporary backup file will not be created. In this case, after Prepare process is completed, the handset must be flashed with flash file and user data will be erased from the memory
NOTE:
If there was any mistakes made during unlock process, and the handset is in "MEM_MAP Blank" mode, then "Prepare" process has to be repeated and the handset has to be flashed with reflash or full_flash file.
At the stage 11, handset screen might display a "Critical error" (Erasing flash memory error 80) message. Please, don’t be worried and strictly follow the instructions of SmartMoto.
Prepare Smart TestPoint
Argon: K1s, K3, V1100, V3re (V3 EDGE, V3_06), V3re (boot v. 0C.F4), V3xx, V3xx Cingular (North America), V6maxx, V9, Foma M702iG, Foma M702iS.
LTE2_ROM4: L9, L72, U3, W5, W490, W510
- Connect powered ON handset to PC via Smart-Clip (phone > USB cable > Smart-Clip > LPT cable > PC).
- Connect S-Card to PC USB port.
- Connect power supply to Smart-Clip and power on the handset.
- Launch SmartMoto.
- Choose "Smart-Clip USB port" in phone connection window.
- Press "Search". The software should perform the following steps:
- SmartMoto detects S-Card;
- SmartMoto detects Smart-Clip;
- SmartMoto detects the handset and reads all phone information.
- Log to bookmark "Prepare"
- Select an appropriate model from the list.
- Mark "Unlock automatically" and press "Prepare Smart TestPoint" button.
- Prepare operation is in progress. The handset gets reloaded, backup of firmware is saved.
- SmartMoto pops up the message requiring Smart TestPoint cable to be connected. Please perform the following:
- Disconnect the handset and dismantle it
- Please ensure that LCD is disconnected from the board!!!
- Connect Smart TestPoint cable to the port RJ45 on Smart-Clip
- Connect data cable to the phone
- Connect battery hook to the positive (+) battery contact on PCB
- Connect needle A to the primary TestPoint A, hold it until the software informs that it can be disconnected and press OK in SmartMoto.
- The handset should be detected with boot version 0.00.
- Unlock procedure continues.
- Disconnect TP needle when SmartMoto informs to do so.
- If the option "Unlock automatically" was marked – the handset becomes unlocked. If the option was not selected then the handset can be served for Flash, Repair PDS, Unlock or Backup purposes.
NOTE. W490/W510 and Foma M702iG schematic contains 2 TestPoints, A (primary) and B (secondary). In case if unlock fails using single TestPoint A, please perform the process, using both TestPoints simultaneously (connect needle A to TP A and needle B to TP B).
The Smart TestPoint v2.0 cable contains two TestPoint needles and a Battery Hook:
- Yellow - TestPoint A (Primary)
- Black - TestPoint B (Secondary)
- Red - Battery Hook
Please follow this order strictly. Do not use power from the battery. Use battery hook and ensure that it’s connected to the appropriate ("+" Positive) contact.
C975 (fw … 91i)/E1070 (fw ... F11P) unlock procedure
Before starting the unlock procedure, please check the boot version of the phone.
- Connect powered ON handset to PC via Smart-Clip (phone > USB cable > Smart-Clip > LPT cable > PC).
- Connect S-Card to PC USB port.
- Connect power supply to Smart-Clip and power on the handset.
- Launch SmartMoto.
- Choose "Smart-Clip USB port" in phone connection window.
- Press "Search". Software should perform the following steps:
- SmartMoto detects S-Card;
- SmartMoto detects Smart-Clip;
- SmartMoto detects the handset and reads all information.
The next steps depend on the phone boot version. Follow the instructions in the schedule, please.
Boot 6.36/ 6.71/ 6.81 |
Boot 6.31 |
Boot 5.F1/ 6.10/ 6.12 |
- Log to bookmark "Prepare".
- Unmark option "Unlock automatically after prepare" and select the appropriate model from SmartMoto list. Make sure that phone model and boot version of the phone to be unlocked exactly match the model and boot version stated in the list.
- Press "Prepare" button.
- The prepare cycle starts. SmartMoto creates a Temporary Backup File from the handset firmware.
- At this time popup window appears at SmartMoto interface. Please follow the instructions provided therein
- Disconnect cable from the phone;
- Remove and insert phone’s battery;
- Press "Power on" key on the phone. Phone's LCD remains blank;
- Connect cable to the phone;
- Press OK in SmartMoto.
- The handset should be detected by SmartMoto as "S Blank..."
- SmartMoto restores the temporary backup file.
|
- Log to bookmark "Unlock".
- Pickup correct model from the scrolling list.
- Press "Remove RSA".
- Phone goes into boot mode. Reserve copy of security area is created.
- Part of phone firmware is reflashed.
- Phone doesn't power on after that. SmartMoto will give the message requiring to take phone into boot mode by pressing keys combination: *,#, PWR ON (at this moment the phone has to be connected with USB cable).
- Press "OK" button. Wait till the process finishes.
|
- Log to "Flash" tab.
- Press "Enter flash mode".
- The phone enters a flash mode (continue with the step 14, please).
P.S. Alternatively, the handset can be connected using a TestPoint method. After that log to bookmark "Flash", press "Enter flash mode" and continue with the step 14. |
- Log to bookmark "Unlock".
- Select the appropriate model from SmartMoto list and press "Unlock via patch" button.
- Wait for the process to complete.
- Phone is unlocked.
NOTE
Please, don’t use a "Forced boot mode cable" for unlock procedure, provided above.
I-Mode unlock instruction
L6/L7 i-mode models have a specific hardware, so it requires different drivers to be installed:
Warning
I-Mode drivers are not compatible with Win9x/ME. Win2k/XP is required.
- Connect powered handset to PC USB port.
- Locate the drivers at SmartMoto installed directory (__:\Program Files\GsmServer\SmartMoto\iMode drivers\ …). The modem port will be installed to the system.
- Connect S-Card dongle. Launch SmartMoto. Be aware that Smart-Clip is not required for unlock of L6/L7 i-mode models.
- Select "Computer COM ports" in "Phone connection" window and log to the bookmark "I-MODE".
- Select the phone corresponding COM port (usually is the highest port number).
- Press "Read Code" button. The handset goes into "test mode".
- The software gets several codes from the handset. Status (LOCKED/UNLOCKED) of each code will be displayed. Codes with status "LOCKED" should be entered to the phones submenu to perform the unlock process.
- The handset automatically powers ON.
- Disconnect the cable. Press and hold "*" (asterisk) button on the keypad.
- While holding the "*" (asterisk) key type the required pass to enter the submenu.
- The unlock request appears on the phones screen. Press OK.
- Enter the unlock code provided by SmartMoto and press MENU button.
- The procedure, starting from step 9, has to be performed for each code with status "LOCKED"
- Unlock done.
List of codes and submenu passes:
| Code type |
NET |
IMSI |
NS |
CORP (CP) |
SP |
EXT |
Reset |
FW Version |
| Submenu pass * |
787090
or
787292 |
362628
or
360608 |
476989 |
482896
or
480896 |
967678 |
574243 |
65512890 |
5806 |
Note:
Please remember to update Smart-Clip first and perform S-Card update after that only.
We recommend to use only the latest versions of Smart-Clip, S-Card and SmartMoto.
Warning
In case if i-mode modem is set to COM port 100 or higher, the handset will not get detected by SmartMoto.
General TestPoint connection method
That method can be used for Flash/Backup/Repair/Unlock purposes. To perform a TestPoint procedure the handset requires to be disassembled. TestPoint schematics are located at Public Downloads section of www.boot-loader.com. No need to perform a Clip Login to access TP pictures. Use the TestPoint for each specific phone model and follow the step-by-step instruction strictly. Please note that with some models there is a single contact that should be grounded (connected to the metal cover), others have two contacts that should be connected to each other. In most cases TP contacts are protected by a metal cover, which has to be cut or drilled for TestPoint procedure.
However, in case of any hardware damage or phone warranty termination caused by TestPoint procedure Smart-Clip developer does not bear any responsibility.
General "Unlock via TestPoint" procedure
TestPoint unlock procedure should de performed for the listed below models:
And for the models with specified boot versions:
- A1000 - boot versions starting from 6.32
- C390 - boot version 8.26
- C980 - boot versions starting from 6.36
- E1000 - boot versions starting from 6.36
- L7 - boot versions starting from A.52
- M1000 - boot versions starting from 6.32
|
- V3i - boot versions starting from A.52
- V3r - boot versions starting from A.52
- V3t - boot version A.52
- V975 - boot versions starting from 6.36
- V980 - boot versions starting from 6.36
- V1050 - boot versions starting from 6.36
|
- Disassemble the phone.
- Connect phone PCB to PC via Smart-Clip (phone > USB cable (not repair one)> Smart-Clip > LPT cable > PC).
- Connect S-Card to PC USB port.
- Connect power supply to Smart-Clip.
- Launch SmartMoto.
- Choose "Smart-Clip USB port" in phone connection window.
- Connect TestPoint to ground (to each other).
- Connect phone battery.
- Press "Search". Software should perform the following steps:
- SmartMoto detects S-Card;
- SmartMoto detects Smart-Clip;
- SmartMoto detects the handset as "S Blank Neptune LTE", "S Blank"Paragon POG" or "S Blank Rainbow".
- Disconnect TestPoint.
- Log to bookmark "Unlock".
- Select a correct model from the scrolling list.
- Press "Unlock via TestPoint".
- Disconnect PCB after the process is completed.
- Assemble the phone.
Some phone models require a particular procedure to be performed while using "Unlock via TestPoint" method. Specific procedures for each model are provided blow.
Please note:
During TestPoint unlocking procedure phone's LCD must be disconnected.
Do not use hot air fan to remove a metal shield on PCB. This can seriously damage the handset.
Use any other alternative tool to cut or drill it. Please make sure you do not damage the board
We strictly recommend to make a backup of flash from the handset before performing any procedure. This will enable you to restore the handset to its original state in case of unlock process failure.
A1200, E2, E6 "Unlock via TestPoint" procedure
- Disassemble the phone.
- Connect phone PCB to PC via Smart-Clip (
phone > USB cable> Smart-Clip > LPT cable > PC).
- Connect S-Card to PC USB port.
- Connect power supply to Smart-Clip.
- Launch SmartMoto.
- Choose "Smart-Clip USB port" in phone connection window.
- Connect TestPoint to ground.
- Press and hold side key A.
- Connect phone battery.
- Release side key A.
- Press "Search" in SmartMoto. Software should perform the following steps:
- SmartMoto detects S-Card;
- SmartMoto detects Smart-Clip;
- SmartMoto detects the handset as "NS Flash Interface".
- Press and release side key A once again.
- At this stage the phone will be detected as "S Blank LTE2 Neptune".
- Disconnect TestPoint.
- Log to bookmark "Unlock".
- Select a correct model from the scrolling list.
- Press "Unlock via TestPoint".
- Disconnect PCB after the process is completed.
- Assemble the phone.
Unlock procedure for M1000
Models with boot versions up to 0.6.1.2 could be unlocked simply by pressing "Unlock" button on Smart-Clip (standard unlock procedure for P2K models).
M1000 (boot version 0.6.1.2) needs to be unlocked via Remove RSA option
- Connect handset to PC via Smart-Clip (phone > USB cable > Smart-Clip > LPT cable > PC).
- Connect S-Card to PC USB port.
- Connect power supply to Smart-Clip and power on the handset.
- Launch SmartMoto.
- Choose "Smart-Clip USB port" in phone connection window.
- Press "Search". Software should perform the following steps:
- SmartMoto detects S-Card;
- SmartMoto detects Smart-Clip;
- SmartMoto detects the handset and reads all information.
- Log to bookmark "Unlock".
- Pickup correct model from the scrolling list.
- Press Remove RSA.
- Phone enters boot mode, message "Waiting" appears on the bottom of phone’s display.
- Press 1 and 2 buttons simultaneously in upper part of the handset and SmartMoto will continue the process.
- Program will show a popup window with procedure description to be followed:
- Remove phone battery;
- Ensure that USB cable is plugged into the phone;
- Press phone buttons 1 and 2 simultaneously;
- While holding button 1 and button 2, insert battery;
- Release buttons 1 and 2;
- Message "Waiting" should appear on the bottom of phone’s display;
- Press and release phone buttons 1 and 2 simultaneously once more;
- Message "Waiting" should disappear, press 'OK' to continue.
- SmartMoto finishes removing RSA, the handset turns ON.
- Now phone requires being unlocked with Unlock button of Smart-Clip.
- Connect the phone to the powered Clip.
- Press UNLOCK button on the Clip.
- Phone reloads. Within 5-10 seconds message "Waiting" appears on the bottom of the phone’s display.
- Press 1 and 2 buttons simultaneously in upper part of the handset. Message "Waiting" disappears, phone enters boot mode (if you don't press these 2 keys during message "Waiting" is displayed, the clip will give red E/G led and you will have to start with step 15 again).
- After 1 and 2 buttons have been pressed E/G green led will blink and phone reboots. Meanwhile E/G will give frequent green blinking and phone will turn on. Do not disconnect cell phone from Smart-Clip while green led indicator blinks!
- Green E/G led glows.
- The cell phone is unlocked.
M1000 variants with higher boot versions will require TestPoint procedure to be unlocked.
Please be aware that TP procedure and data cable for M1000 differ from those for other P2K models.
TestPoint unlock procedure for M1000
- Disassemble the phone.
- Connect phone PCB to PC via Smart-Clip (phone > USB cable (not repair one)> Smart-Clip > LPT cable > PC).
- Connect S-Card to PC USB port.
- Connect power supply to Smart-Clip and power on the handset.
- Launch SmartMoto.
- Choose "Smart-Clip USB port" in phone connection window.
- Connect TestPoint A to TestPoint B.
- Press Button 1 and Button 2 simultaneously.
- While holding Button 1 and Button 2 insert battery.
- Release Button 1 and Button 2 for 1 second.
- Press and release again Button 1 and Button 2 simultaneously.
- Press "Search". Software should perform the following steps:
- SmartMoto detects S-Card;
- SmartMoto detects Smart-Clip;
- SmartMoto detects the handset as "S Blank Neptune LTE", "S Blank"Paragon POG" or "S Blank Rainbow POG".
- Disconnect TestPoint.
- Log to bookmark "Unlock".
- Select a correct model from the scrolling list.
- Press "Unlock via TestPoint".
- Disconnect PCB after the process is completed.
- Assemble the phone.
Please note:
During TestPoint unlocking procedure phone's LCD must be disconnected.
Do not use hot air fan to remove a metal shield on PCB. This can seriously damage the handset.
Use any other alternative tool to cut or drill it. Please make sure you do not damage the board
We strictly recommend to make a backup of flash from the handset before performing any procedure. This will enable you to restore the handset to its original state in case of unlock process failure.
Unlock procedure for A1000 phone with TestPoint
- Disassemble the phone.
- Connect phone PCB to PC via Smart-Clip (phone > Forced boot mode cable > Smart-Clip > LPT cable > PC).
- Connect S-Card to PC USB port.
- Connect power supply to Smart-Clip.
- Launch SmartMoto.
- Choose "Smart-Clip USB port" in phone connection window.
- Connect TestPoint A to TestPoint B.
- Connect phone battery.
- Push Button 1 and Button 2 simultaneously.
- Press "Search" button in SmartMoto. Software should perform the following steps:
- SmartMoto detects S-Card;
- SmartMoto detects Smart-Clip;
- SmartMoto detects the handset as "S Blank Neptune LTE", "S Blank"Paragon POG" or "S Blank Rainbow POG".
- Disconnect TestPoint.
- Log to bookmark "Unlock".
- Select a correct model from the scrolling list.
- Press "Unlock via TestPoint".
- Disconnect PCB after the process completed.
- Assemble the phone.
Please note:
During TestPoint unlocking procedure phone's LCD must be disconnected.
Do not use hot air fan to remove a metal shield on PCB. This can seriously damage the handset.
Use any other alternative tool to cut or drill it. Please make sure you do not damage the board
We strictly recommend to make a backup of flash from the handset before performing any procedure. This will enable you to restore the handset to its original state in case of unlock process failure.
Sendo snd2xx/snd3xx/snd5xx/snd6xx/snd8xx unlocking procedure
- Power off the phone.
- Connect Smart-Clip to the phone using RJ45 cable (pinouts below).
- Press UNLOCK button.
- Press Power button on the phone within 5 seconds after you press UNLOCK button on a Clip. RX/TX leds will blink.
- E/G led will glow green on success.
- When you unlock Sendo phone use either fully charged phone battery OR power supply from Smart-Clip. Don't use them both at the same time! If you use power supply from Smart-Clip, make sure current is not less than 300mA, otherwise not all data will be properly recorded into the phone.
Smart-Clip update procedure
- Connect S-Card dongle to PC USB port.
- Connect Smart-Clip to PC using Smart Adaptor or LPT cable.
- Power Smart-Clip on (warning: don’t use battery!).
- Go to our Update Zone.
- Update Zone uses ActiveX control, answer "Yes" to install and run it.
- Press "Connect" button.
- An ActiveX client should detect S-Card dongle and Smart-Clip.
- Press "Update" if the Smart-Clip version is out of date.
- Wait until update procedure is completed and then power Smart-Clip off.
- Disconnect LPT cable.
- Remove S-Card dongle from USB port.
Please note:
After the first Smart-Clip update and account registration at www.boot-loader.com a new user activates the service in accordance with standard price plan. Access is provided within one year period since the first Smart-Clip update (date of the first update + 1 year). In case if Smart-Clip has not been updated before logging in at www.boot-loader.com, the access will not be valid and user will be asked to perform the update procedure.
|


